-
Introduction
-
Basics
-
Setup for VIVE Focus Vision, VIVE XR Elite, and VIVE Focus 3
-
Setup for SteamVR-compatible headsets
-
Solutions and FAQs
-
General
- Troubleshooting VIVE Ultimate Tracker
- Can VIVE Ultimate Tracker enter pairing mode immediately after turning it on?
- Why can't I pair new trackers?
- Why am I experiencing stuttering in my PC VR streaming session while using VIVE Ultimate Tracker?
- Why is the status LED on the tracker continuously breathing green?
- Is there a way to restart the tracker?
- Why can't I see tracker information in settings?
- What should I do if I'm having problems connecting VIVE XR Elite with VIVE Ultimate Tracker?
- What should I do if I'm using VIVE Location-Based Software Suite (LBSS) with VIVE Focus 3?
- How do I set up full-body tracking in VRChat?
- Can I use VIVE Ultimate Tracker with other headsets?
- How do I set VIVE Ultimate Tracker to LBE mode?
-
Tracking
-
Setting up VIVE Ultimate Tracker
Before using
VIVE Ultimate Tracker, you'll need to set it up.
See the following topics for ways to set up the tracker.
Setting up VIVE Ultimate Tracker using VIVE Manager
Set up
VIVE Ultimate Tracker using
VIVE Manager.
Important: Before pairing with your headset, make sure:
- The VIVE Wireless Dongle is connected to the headset and the headset is turned on and not in sleep mode. See Attaching the VIVE Wireless Dongle to VIVE XR Elite or Attaching the VIVE Wireless Dongle to VIVE Focus Vision or VIVE Focus 3.
- VIVE Manager (version 2.0.33 or later) is installed on your phone and paired with your headset.
- VIVE XR Elite software version is 1.0.999.508 or later or if using VIVE Focus 3, software version must be 6.0.999.948 or later.
- After updating the software of VIVE Focus 3 to support VIVE Ultimate Tracker, restart the headset. If you're using VIVE Location-Based Software Suite (LBSS) with VIVE Focus 3, see What should I do if I'm using VIVE Location-Based Software Suite (LBSS) with VIVE Focus 3?.
-
Get your tracker accessories ready, and then do any of the following:
- For body tracking, first fasten the tracker bases to the trackstraps. Then put the trackstraps on your body, but don't attach the trackers to them yet.
Tip: For tips on how to wear the tracker accessory and tracker on your body for optimal tracking, see Wearing VIVE Ultimate Tracker on your body.
- For object tracking, fasten each tracker base to a compatible mount, but don't attach the trackers to them yet.
- For body tracking, first fasten the tracker bases to the trackstraps. Then put the trackstraps on your body, but don't attach the trackers to them yet.
-
Open
VIVE Manager and tap
Devices.
Note: If you've paired headsets before, tap the down arrow to open the Devices dropdown menu and select your headset.
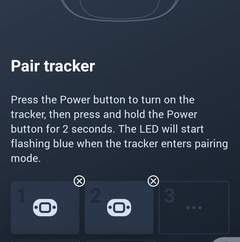
- Tap Inputs > Motion trackers, and then tap Pair or + in the upper right.
- Press the power button on VIVE Ultimate Tracker to turn it on.
- Press and hold the power button on the tracker for two seconds to enter pairing mode. The status LED will start flashing blue.
-
When
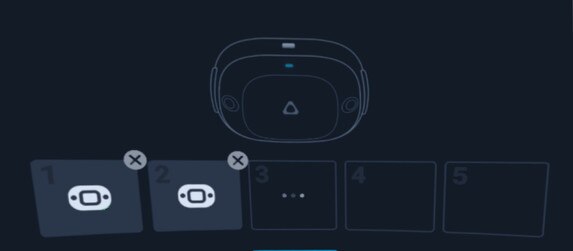
VIVE Ultimate Tracker is paired and connected, a tracker icon will appear in one of the slots.
You can pair up to five trackers at a time.

- After you're done pairing your trackers, tap Done.
- Go to the center of the play area and put on your headset.
-
Select
Start, and then follow the onscreen instructions to scan your area.
Scanning the low-angle areas of your environment helps improve tracking performance when using
VIVE Ultimate Tracker at knee height or below.
Note:After scanning, check that the trackers are being tracked properly before attaching them to your body.
- Make sure you're in the center of your play area before you select Start scan.
- Make sure you're kneeling down throughout the scanning process.
- When using the tracker in the future, you may be asked to scan your area again depending on your environment.
- Stand up and stay in the center of your play area.
-
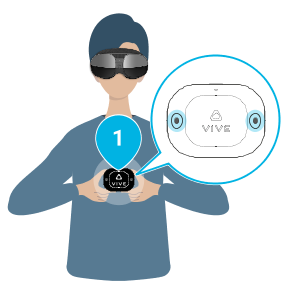
Hold each tracker in front of your chest with the cameras facing outward until you see the blue numbered label above the tracker in VR.
 Important:
- You'll need to do this for each tracker that you've paired.
- Make sure you're not covering the tracker's cameras with your fingers while holding the tracker.
- After confirming the trackers are working properly, attach them to your body and select Next.
-
Move around and see if the blue labels stay pinned to your trackers, and then select
OK.
Note: If the blue labels drift from the trackers, select Trackers drifting? to see how to fix the problem.You'll then be taken to the Motion trackers settings page where you can learn about the available tracker options.
- After setting up, you can assign a role to your tracker. See Assigning motion tracker roles via VIVE Manager.
- In Settings > Inputs > Motion trackers, select ? in the upper right to learn how to troubleshoot tracking issues and see tips on how to attach trackers for optimal tracking.
Setting up VIVE Ultimate Tracker in VR
Set up
VIVE Ultimate Tracker in VR.
Important: Before setting up your headset, make sure:
- The VIVE Wireless Dongle is attached to the headset. See Attaching the VIVE Wireless Dongle to VIVE XR Elite or Attaching the VIVE Wireless Dongle to VIVE Focus Vision or VIVE Focus 3.
- VIVE XR Elite software version is 1.0.999.508 or later or if using VIVE Focus 3, software version must be 6.0.999.948 or later.
- After updating the software of VIVE Focus 3 to support VIVE Ultimate Tracker, restart the headset. If you're using VIVE Location-Based Software Suite (LBSS) with VIVE Focus 3, see What should I do if I'm using VIVE Location-Based Software Suite (LBSS) with VIVE Focus 3?.
-
Get your tracker accessories ready, and then do any of the following:
- For body tracking, first fasten the tracker bases to the trackstraps. Then put the trackstraps on your body, but don't attach the trackers to them yet.
Tip: For tips on how to wear the tracker accessory and tracker on your body for optimal tracking, see Wearing VIVE Ultimate Tracker on your body.
- For object tracking, fasten each tracker base to a compatible mount, but don't attach the trackers to them yet.
- For body tracking, first fasten the tracker bases to the trackstraps. Then put the trackstraps on your body, but don't attach the trackers to them yet.
- Go to your play area and put on your headset.
- From Home, select Settings > Inputs > Motion trackers > Pair new/Pair.
- Pick up the tracker and press the power button to turn it on.
- Press and hold the power button for two seconds to enter pairing mode. The status LED will start flashing blue.
-
Once
VIVE Ultimate Tracker is paired and connected, a tracker icon will appear in one of the slots.
You can pair up to five trackers at a time.

- After you're done pairing your trackers, select Done.
-
Select
Start and then follow the onscreen instructions to scan your area.
Scanning the low-angle areas of your environment helps improve tracking performance when using
VIVE Ultimate Tracker at knee height or below.
Note:After scanning, check that the trackers are being tracked properly before attaching them to your body.
- Make sure you're in the center of your play area before you select Start scan.
- Make sure you're kneeling down throughout the scanning process.
- When using the tracker in the future, you may be asked to scan your area again depending on your environment.
- Stand up and stay in the center of your play area.
-
Hold each tracker in front of your chest with the cameras facing outward until you see the blue numbered label above the tracker in VR.
 Important:
- You'll need to do this for each tracker that you've paired.
- Make sure you're not covering the tracker's cameras with your fingers while holding the tracker.
- After confirming that the trackers are working properly, attach them to your body and select Next.
-
Move around and see if the blue labels stay pinned to your trackers, and then select
OK.
Note: If the blue labels drift from the trackers, select Trackers drifting? to see how to fix the problem.You'll then be taken to the Motion trackers settings page where you can learn about the available tracker options.
- After setting up, you can assign a role to your tracker. See Assigning motion tracker roles via VIVE Manager.
- In Settings > Inputs > Motion trackers, select ? in the upper right to learn how to troubleshoot tracking issues and see tips on how to attach trackers for optimal tracking.
Related How-tos
Was this helpful?
Yes
No
Submit
Thank you! Your feedback helps others to see the most helpful information.