-
Introduction
-
Hardware
-
System setup
- Setting up VIVE Mars CamTrack
- Example virtual production studio setup
- Connecting Mars to your PC
- Mounting VIVE Tracker (3.0) to Rover
- Connecting Rover to Mars
- Setting up the base stations
- Tips for setting up the base stations
- Adding Mars as an endpoint in Unreal Engine
- Enabling FreeD on Mars and adding Mars to Aximmetry
- Manually updating the Mars firmware
-
Camera calibration
-
Real-time compositing in Unreal Engine
-
FAQs
- How many base stations can I use?
- Can I use an odd number of base stations?
- Cleaning the base stations
- Can I use more than one VIVE Tracker (3.0)?
- Why does VIVE Tracker (3.0) automatically turn off?
- How do I verify that VIVE Tracker (3.0) is detected?
- What does the status light on VIVE Tracker (3.0) mean?
- Why doesn't the VIVE Tracker (3.0) status icon on the Mars dashboard turn blue?
- Troubleshooting VIVE Tracker (3.0)
- Why can't I see the incoming video feed in the Camera Calibration Tool?
Setting up the base stations
Here's how to set up the base stations for
VIVE Mars CamTrack.
-
Mount the base stations at the edge of the tracking area near power outlets.
Note:
If you're not able to mount the base stations using the mounting kit, you can attach them to tripods or place them on a stable surface, as long as it's high enough.
For details on using the mounting kit, visit VIVE Support.
-
Face each base station toward the center of the tracking area where you plan to set up the calibration board.
See
Collecting calibration data using the
Camera Calibration Tool for details.
Important: Remember to peel the protective film off the front panels of the base stations.
-
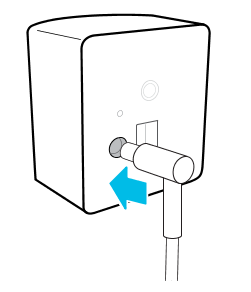
Connect the base stations to power one at a time. Make sure the first base station is detected by
Mars before connecting the second one.
 Important: Only use the power cables and adapters included with the base stations.
Depending on the hardware version of your base stations, the LED indicators will be white or green.
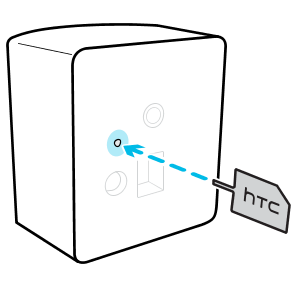
Note: If Mars doesn't automatically detect the base stations, press the channel button on the back with the channel changing pin to set the channel manually. You may need to set the channel manually for any additional base stations you connect.
The status icon on the Mars dashboard will turn blue about 10-15 seconds after setting the base station channel.
Was this helpful?
Yes
No
Submit
Thank you! Your feedback helps others to see the most helpful information.