-
Getting started
- About the VIVERSE app
- Creating avatars
- Using the VIVE Avatar Creator mobile app
- Signing in to VIVERSE and choosing your avatar
- Navigating VIVERSE with hand gestures
- Navigating VIVERSE with VR controllers
- Things you can do in your home space
- The VIVERSE Menu
- Changing your avatar
- Changing the background theme
- Playing background music
- Accessing your Friends list
- Private Talk
- Changing your status
-
Tools you can use
-
Using content windows
-
Uploading and downloading content
-
Working with 3D models
-
Solutions and FAQs
-
General
-
Content windows
-
Avatar
-
3D models
-
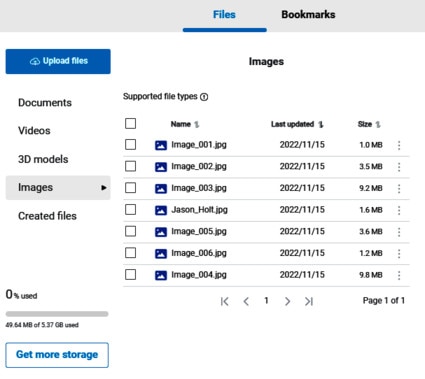
Uploading files to VIVERSE
Before you can view files—PDFs, videos, 3D models, and images—in the virtual space, you need to upload them to the cloud storage used by
VIVERSE.
- In your web browser, go to sync.vive.com and sign in with your HTC account.
-
At the top of the webpage, click
Storage.
The
Files tab will be selected automatically.
Tip: The left-hand side displays the types of files that can be uploaded. Click a file type and then hover over the info icon
 to see which file formats are supported. See
Types of files you can view in
VIVERSE for details.
- Click Upload files > Add files.
- Select the files you want to upload and click Open.
- Click Next to start uploading the files.
Files you've uploaded will be added under the corresponding file types in the Files tab.

Tip:
You can do any of the following with uploaded files:
- Click
 next to a file to rename or delete it.
- Click the column heading to sort by filename or date.
- To delete several files, select them from the list, and then click
 Delete.
- To delete all files, select
Name, and then click
 Delete.
Was this helpful?
Yes
No
Submit
Thank you! Your feedback helps others to see the most helpful information.