-
Introduction
-
Basics
-
Setup for VIVE Focus Vision, VIVE XR Elite, and VIVE Focus 3
-
Setup for SteamVR-compatible headsets
-
Solutions and FAQs
-
General
- Troubleshooting VIVE Ultimate Tracker
- Can VIVE Ultimate Tracker enter pairing mode immediately after turning it on?
- Why can't I pair new trackers?
- Why am I experiencing stuttering in my PC VR streaming session while using VIVE Ultimate Tracker?
- Why is the status LED on the tracker continuously breathing green?
- Is there a way to restart the tracker?
- Why can't I see tracker information in settings?
- What should I do if I'm having problems connecting VIVE XR Elite with VIVE Ultimate Tracker?
- What should I do if I'm using VIVE Location-Based Software Suite (LBSS) with VIVE Focus 3?
- How do I set up full-body tracking in VRChat?
- Can I use VIVE Ultimate Tracker with other headsets?
- How do I set VIVE Ultimate Tracker to LBE mode?
-
Tracking
-
Creating a tracking map for your play area
To use
VIVE Ultimate Tracker, you'll need to set up your play area's tracking map. Here's how.
Important: Make sure of the following:
- You've paired VIVE Ultimate Tracker with the VIVE Wireless Dongle. See Pairing the VIVE Ultimate Tracker with the VIVE Wireless Dongle.
- The PC you'll be using is in your play area.
- On your computer, launch VIVE Hub.
-
Open the
VIVE Hub settings by clicking
 > Settings.

- On the left panel, click VIVE Ultimate Tracker.
-
On the
Trackers tab, click
Start setup next to
Tracker setup.
VIVE Hub will check if the dongle cradle is connected to the computer and if any paired trackers are found.

- Click Next to continue.
-
You'll now scan your environment to create the tracking map. Here's how:
- Click Create tracking map.
-
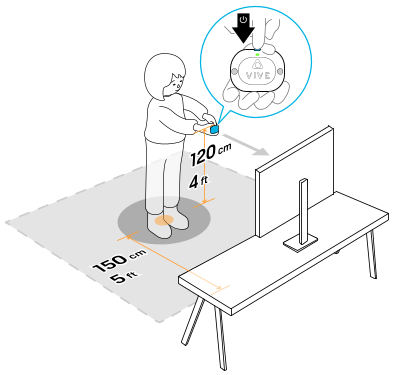
Pick up the tracker whose status LED is flashing green and press its power button.
Important: If you've paired several trackers, make sure to pick up the tracker that's been identified.
- Hold the tracker still with the tracker's cameras facing the computer screen.
- Stand up and hold the tracker 120 cm (4 feet) from the ground.
-
With the tracker's cameras still facing your computer screen, slowly walk backwards until you're around 150 cm (5 feet) away from the computer screen. Then press the tracker's power button.
This will be set as the center of your play area.

-
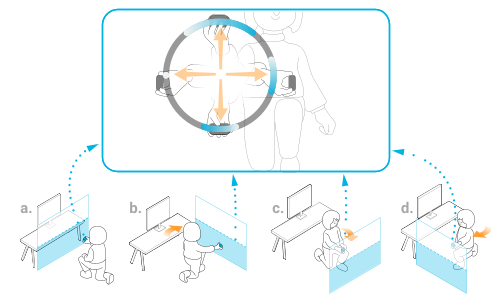
Now scan your environment from a low angle. While in the center of your play area:
- While facing your computer screen, kneel down and point the tracker up, down, left, and right until the ring is completely filled in.
- While still kneeling down, turn your body right (face the wall to the right of your computer screen) and repeat the scanning process.
- While still kneeling down, turn your body right (face the wall opposite your computer screen) and repeat the scanning process.
-
While still kneeling down, turn your body right (face the wall to the left of your computer screen) and repeat the scanning process.
 Tip: While scanning:
- If your computer has speakers connected to it, turn them on so you can hear audio hints.
- Glance at your computer screen once in a while to check for messages and your scanning progress.
-
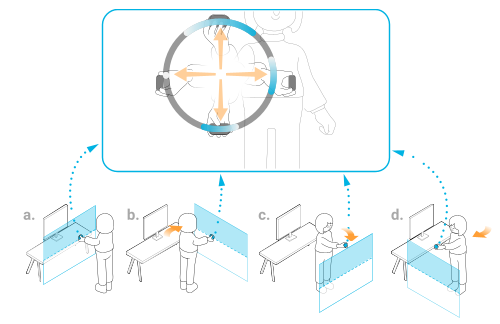
Next, scan your environment while standing up. While in the center of your play area:
- While standing up and facing your computer screen, point the tracker up, down, left, and right until the ring is completely filled in.
- Turn your body right (face the wall to the right of your computer screen) and repeat the scanning process.
- Turn your body right (face the wall opposite your computer screen) and repeat the scanning process.
-
Turn your body right (face the wall to the left of your computer screen) and repeat the scanning process.
 Tip: While scanning:
- If your computer has speakers connected to it, turn them on so you can hear audio hints.
- Glance at your computer screen once in a while to check for messages and your scanning progress.
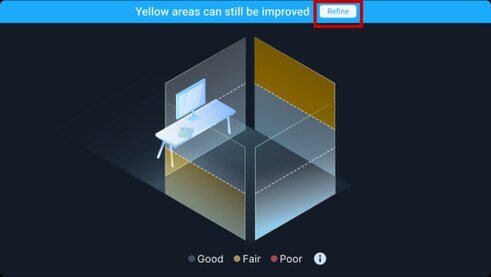
After scanning, the map will be saved automatically.
Important: If after scanning your environment, you see that certain sides of your environment can be refined for better tracking, we
strongly recommend to redo the scan to improve tracking. Click
Refine to scan again the areas that need refinement. When you rescan, yellow areas become white when scanned correctly.

Make sure to save the tracking map after refining the map.
After creating your tracking map, you'll need to calibrate the trackers using the
VIVE Space Calibrator. Watch the animation onscreen to get an idea on how to calibrate the trackers. After watching the animation, click
Open SteamVR. Then follow the steps in
Calibrating
VIVE Ultimate Tracker.
Note: You'll need to run setup again if you change your play area.
Was this helpful?
Yes
No
Submit
Thank you! Your feedback helps others to see the most helpful information.